08 December 2010

WIP Wednesday for 08 December 2010

This is a granny throw that I've been working with between other projects. It's coming to the final few rounds and I  hope to have it finished in the next couple of days. Thanks for stopping in and visiting. If you click on the Work-in-Progress button at the bottom of this post you will be able to see what some other crocheters have been up to. Have a great week!


Free Hat Pattern for Man: "Matt in the Hat"

I was asked for the pattern I used to make my son Matthew a hat. I just winged it but I did write down what I did so I wrote up the pattern for you. Matt is really happy with his hat. Enjoy...


Matt in the Hat:


Materials
ww yarn (not sure how much yarn I used because I started out with less than a full skein and had some left afterwards so it might be safe to start out with a full skein.)
H hook
needle to weave in ends
Stitch marker


Instructions
Rnd 1: Chain 2, and place 6 sc into the 1st ch. Mark the 1st sc and remember to move the marker as you progress. Work in rounds--you will not be turning. (6 sc)
Rnd 2: 2 dc into each sc. (12 dc)
Rnd 3: dc into each sc.(24 dc)
Rnd 4: *2 dc in the 1st dc, and 1 dc in the next dc* repeat from * to * for remainder of round. (36 dc)
Rnd 5: *2 dc in the 1st dc,1 dc in ea of the next 2 dc* Repeat from * to * for remainder of round. (48 dc)
Rnd 6: *2 dc in the 1st dc, 1 dc in ea of the next 3 dc* Repeat from * to * for remainder of round. (60 dc)
Rnd 7: *2 dc in the 1st dc, 1 dc in ea of the next 4 dc*, Repeat from * to * for remainder of round. (72 dc)
Rnd 8: *2 dc in the 1st dc, 1 dc in ea of the next 17dc * for remainder of round (76 dc)
Rnd 9-20: 1 dc in ea of the 76 sts.
Rnd 21 : sc in blo for entire round (76) (this makes the "brim" fold up easier)
Row 22-26: dc in all stitches (76)
Row 27: sc in each dc (76)
Finish off. Voila it is done!


Copyrighted by Sharon Gardner 2010. Do NOT post pattern or photo(s) to other web pages or sell pattern. You may link to pattern. You may make and sell items made from this pattern.

Note: I'm the only one who has made a hat from this pattern so far. If you see any discrepancies please let me know and I will fix the pattern. Thank you very much.

Search Amazon.com for crochet dude

Old School Crochet--

The following patterns are in the open domain and are taken from the Project Gutenberg site. This item is taken from: ENCYCLOPEDIA OF NEEDLEWORK BY THÉRÈSE DE DILLMONT


Crochet square (fig. 441).—Begin with 4 chain stitches, and work 1 single on the 1st chain, to make a round. Work, 1 chain and 2 plain on the next chain, 3 plain on each of the next 3 chain, 1 plain on the stitch on which the two first plain are worked.
Slip the next stitch, that is, put the needle in between the horizontal bars of the 1st plain stitch of the previous row, and draw the thread out without making a stitch.
Then make 1 chain and 2 plain on the slipped stitch.
After which, you make 3 plain on the second of the 3 plain that form the corner, and 1 plain on all the other stitches of the last row. The beginning and end of each row, are worked as described above.
Fig. 441 represents a square, worked in consecutive rows. In making a crochet square, the rows may end in the middle of a side.
FIG. 441. CROCHET SQUARE. Fig. 441. Crochet square.
When you use a stitch that has to be worked to and fro, you turn your work at the end of every row and work back along the stitches you have just made.


Crochet hexagon (fig. 442).—Make a foundation chain of 6 stitches, join the round; 12 plain on the 6 chain; finish the row as indicated for the previous figure == turn the work == * 1 plain, 3 plain on the second plain of the last row; repeat 5 times from *. Finish the row with 1 single == turn the work == 2 plain, 3 plain on the second of the first 3 plain; 3 plain and so on. These hexagons can be made of any size.

FIG. 442. CROCHET HEXAGON. 
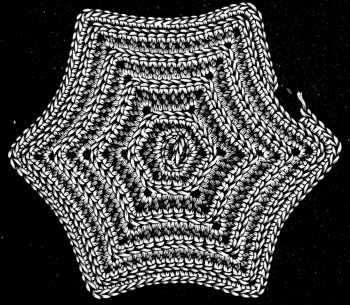
Fig. 442. Crochet hexagon.


Coloured star worked into a light ground (fig. 443).—Begin with 3 chain, join the ring = 2 plain on each of the 3 chain; then for the foundation, 1 plain with the dark thread, and 1 with the light on each of the 6 plain.
In each subsequent row, make one dark stitch more, increasing regularly, that is, making 2 stitches on the last light stitch that comes before the dark ones.
Proceed in this manner until you have 6 or 8 dark stitches, in all and then begin to decrease in every row by one, until there is at last only one dark stitch remaining.
These stars are used in the making of purses, cap-crowns and mats for lamps, etc.
FIG. 443.
COLOURED STAR WORKED INTO A LIGHT GROUND. 
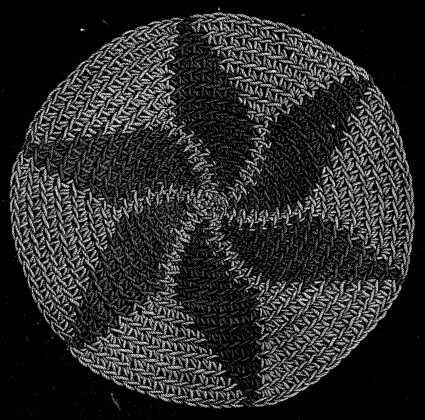
Fig. 443. Coloured star worked into a light ground.

Body Part Measurements ;)


No, I'm not getting into something I shouldn't. I want to post this link for all of you crocheters and me because there is a size chart with measurements for heads, babies, feet and so on as a reference if you want to make up your own pattern for say baby booties, just check the info and see that an average 3 to 6 month old baby will have 4 to 4 1/2 inch feet. This is great info that I found a reference to when I was reading some posts over at crochetville.

Search Amazon.com for measuring tape sewing